Dosprn 20 Registration Key Verified -

Version: v7.6
Date: June 2025

Dosprn 20 Registration Key Verified -

Welcome to the Future of Collaboration

Thank you for choosing EShare. You are now equipped with a world-class wireless collaboration platform engineered to eliminate barriers, streamline workflows, and unlock seamless interaction in classrooms, meeting rooms, and any environment.

This guide will help you master the full potential of EShare, from instant screen sharing to advanced moderation and hybrid meeting integration. Let's get started.

What's New in v7.6?

1. Quick Start: Casting in Seconds

Ready to share? It's as easy as 1-2-3.

1

OPEN

Simply open a web browser on your device and go to eshare.app, or launch the EShare app if already installed.

2

CONNECT

The EShare app will automatically discover the receiver on your network. Tap its name to connect instantly.

3

MIRROR

Tap the "Share Screen" button. Your screen is now live. It's that simple.

EShare PC Sender
The main interface of the EShare Sender application on a PC.

2. The EShare Ecosystem

EShare is more than just screen mirroring. It's a complete toolkit for modern collaboration.

CapabilityWhat It Empowers You to Do
Universal Mirroring
Instantly share your screen—and audio—from any Windows, macOS, iOS, Android, ChromeOS or Linux device. Includes reverse touch for controlling your PC from the display.
Multi-Source Split-Screen
Unlimited connections (subject to network conditions). View up to 16 devices on one screen simultaneously. EShare automatically arranges the layout for optimal viewing and comparison.
Moderator Panel
Take control of your classroom or meeting like a pro. Approve, deny, and manage who can share, ensuring a smooth, focused, and productive session.
BYOM
Walk into any meeting room and make it yours. Seamlessly connect your laptop's Teams, Zoom, or Meet video calls to professional cameras and microphones for an elevated meeting experience.
App-Free Integration
Empower anyone to cast using their device's native protocols: AirPlay, Miracast, and GoogleCast. No app required.
Web & Cloud Casting
Enable secure, zero-installation casting for guests (WebCast), or broadcast your screen to remote viewers anywhere in the world (Cloud Broadcast).
Interactive Toolkit
Use your device as an advanced remote, annotate over any content in real-time, and view the main display on your personal device with reverse mirroring (TV Mirror).
Hardware Extension
Experience true plug-and-play simplicity with the EShare Wireless Presentation Dongle. Simply plug it in and tap the button to mirror your screen instantly.
EShare ecosystem diagram
Diagram of the EShare Ecosystem.

3. The EShare Receiver

The Receiver is the powerful, intelligent heart of the EShare experience, running on your main display to manage all incoming connections and content.

3.1 Understanding the Main Screen

The idle screen provides at-a-glance information: the device name, network details, and clear instructions for connecting. The bottom-right corner features six key function buttons:

WebCast
Enable browser-based casting for guests.
Cloud Broadcast
Share screen content with remote viewers worldwide.
BYOM
Configure Bring Your Own Meeting functionality.
Display Group
Set up multi-display synchronization.
Moderator Control Center
Access advanced session management.
Settings
Configure receiver preferences and security options.
EShare receiver main screen
EShare receiver main screen showing connection info and function buttons.

3.2 Mastering Moderator Mode

Click the Moderator button to launch your control center. This gives you complete control of your presentation or class, allowing you to:

Approve/Deny Sharing Requests
No more interruptions. Content is shared only when you allow it.
Invite to Cast
Select a user and invite them to share their screen with a single click.
Manage Permissions
Grant or revoke control and annotation rights for any user.
Disconnect Users
Cleanly end a user's session.
Screen Broadcast
Instantly share the main display's content with all connected devices. Everyone sees exactly what's on the display, automatically.
EShare moderator control panel
The Moderator Control Panel, showing connected users and management options.

3.3 Configuring Your Receiver

In the Settings menu, you can tailor the EShare experience to your specific security and usability needs. Key options include:

Connection Mode
Set security level (Device Name, PIN, or Passcode).
Split Screen
Define the maximum number of simultaneous casters.
App-Free Toggles
Enable/disable native protocols like AirPlay, Miracast.
Lock Settings
Password-protect the settings menu to prevent unauthorized changes.
Display Mode
Choose rendering mode (Auto, Performance, Compatibility).
Auto-Start on Boot
Automatically launch EShare when the system starts up.
PIN Overlay
Display a floating PIN code in the corner of the screen.
Show Client Device Name
Display the casting device's name during screen sharing.
EShare settings panel
The main settings panel for the EShare Receiver.

3.4 Multi-Screen Functionality

EShare supports up to 16 simultaneous casting sessions. The layout automatically optimizes for the number of connected devices.

Intelligent Split Screen
Automatically adjusts screen layout based on content type and number of devices for an optimal viewing experience.
Audio & Full Screen Control
Switch audio between casters or expand any client's content to full screen by clicking the icons on each window.
Multi-Screen Casting
Two devices casting simultaneously in split-screen mode.

3.5 Display Group (One-to-Many)

This powerful feature lets you synchronize content across multiple EShare displays for large venues.

Main Screen Sync
Enable "Duplicate Displays" to broadcast the main screen's content to all grouped displays in real-time.
Client Cast Sync
Set to "Only valid in client screen sharing" to synchronize casting sessions across all grouped displays.
Display Group settings
The Display Group configuration window.

4. The EShare App: Your Control Center

The EShare app is the key to unlocking the full suite of features for casting and collaboration, including advanced tools not available via native protocols.

4.1 Installation

To get started, connect your client device to the same network as the receiver. Visit eshare.app in your browser or scan the on-screen QR code to download the correct application for your device (Windows, macOS, iOS, Android).

EShare web download page
The download page at eshare.app, providing clients for all major platforms.

4.2 Connecting Your Device

Once installed, launch the app. You can connect using one of several methods:

By Device Name

The app auto-discovers receivers. Simply tap the name.

By PIN Code

For secure environments, enter the PIN displayed on the receiver screen to establish a verified connection.

By IP Address

In complex networks, manually enter the receiver's IP address, shown on the main screen.

By QR Code (Mobile)

Scan the QR code on the display for the fastest connection.

Mobile Connection Methods
PC Connection Methods
Pro Tip: PIN Code Types

To use PIN connection, first enable it in ESharePro settings. 6-digit PINs are for local network connections. 8-character PINs allow for secure connections across different network subnets.

4.3 Core Functions (Mobile & Desktop)

The EShare app provides a rich set of tools beyond simple screen sharing.

Mirroring (Share Screen)
Share your entire screen, a specific app window, or use the receiver as an extended wireless display.
File Pushing
Cast photos, videos, and documents directly in original, lossless quality—perfect for high-impact visuals.
Remote Control
Your mobile device becomes a powerful remote with Mouse, Touchpad, Keyboard, and Air Mouse modes.
Wireless Camera (Mobile)
Stream your phone's camera feed live, turning it into a portable, high-quality document camera.
Touch Feedback
Control the casting device from the receiver's touchscreen. Supports Windows, Linux, macOS, iOS, and Android.
Share from Other Apps (Mobile)
Share files directly from other apps to the receiver through the system share menu.
Mobile Sender Interface
Mobile app main screen.
PC Sender Interface
PC app main screen.

4.4 Advanced Features

Bring Your Own Meeting (BYOM)

Use the professional camera and microphone connected to the EShare receiver for your video calls (e.g., Teams, Zoom, Meet). This turns your laptop into the 'brain' of the meeting while using the room's superior audio-visual hardware. When a camera is available, the camera icon in your EShare app becomes active. Click it to enable BYOM mode.

EShare Sender BYOM feature
The camera icon in the app enables BYOM.
BYOM Setup Steps

On Receiver: Enable BYOM service, microphone, and camera in BYOM settings.
On Sender: Click camera icon in EShare app to enable BYOM mode.
In Video Conference: Select "EShare Virtual Camera/Audio" as your camera and microphone.

Reverse Mirroring & Wireless Annotation

Reverse Mirroring (TV Mirror): Tap "TV Mirror" to see the receiver display on your device. From here, you can take private notes, use the annotation tools to draw on the main screen, or simply control the presentation from your seat.

Reverse Mirroring and Annotation
Reverse Mirroring & Annotation (TV Mirror)

Annotation & Exclusive Screen

Exclusive Screen Mode: When multiple clients are casting, tap the "Full screen" button in your app to make your device occupy the entire display, hiding other content. Tap "Restore" to return to the split-screen view.

Exclusive Screen Mode

4.5 Desktop App Professional Features

The desktop version of the EShare app offers enterprise-grade capabilities to elevate your presentations.

Source Selection (PC)
Choose to share your entire screen, a specific application window, or an individual monitor. Perfect for focused presentations.
Annotation Suite (PC)
Access comprehensive annotation tools and save annotated content directly to your computer for future reference.
Quick-Cast Shortcut (Windows)
Create a desktop shortcut for any receiver. In the future, just double-click to connect and cast instantly.
EShare Sender Professional Features
The PC sender app highlighting advanced features.
Pro Tip: Power User Setup

Pin EShare to your taskbar. Create desktop shortcuts for frequently used receivers and configure auto-cast for your primary meeting rooms. This enables one-click presentations.

5. Native Integration (App-Free)

For ultimate convenience and accessibility, EShare supports the industry's leading native casting protocols. This allows any user—including guests or those on restricted devices—to share their screen instantly, with zero software installation required.

AirPlay

Integrated directly into macOS, iOS, and iPadOS, AirPlay is the perfect solution for quickly sharing content from an iPhone or MacBook.

How to Connect:

  1. Open Control Center on your device.
  2. Tap the Screen Mirroring icon ().
  3. Select the EShare receiver's name from the list.
AirPlay Screen Mirroring on iOS

Miracast

Miracast is the native wireless display standard built into Windows and Android operating systems. It enables direct, peer-to-peer screen sharing without needing to connect to the same network.

How to Connect:

  1. On your Windows PC, press Win + K. On Android, find the Cast/Smart View option.
  2. The "Connect" panel will appear, scanning for wireless displays.
  3. Select the EShare receiver's name from the list.
Miracast Connect Panel on Windows

Google Cast

Built into the Chrome browser and Chrome OS, Google Cast is a versatile way to share content to the main display.

How to Connect:

  1. Open the Google Chrome browser.
  2. Click the Cast icon ().
  3. Choose what you want to share (e.g., "Cast tab").
  4. Select the EShare receiver's name from the list.
Google Cast from Chrome Browser

6. Guest & Remote Access

WebCast: For On-Site Guests (Zero Installation)

A guest needs to share their screen but can't install software? No problem.

1

Navigate

Guest opens a browser to casts.app.

2

Enter ID

They enter the ID from the EShare screen.

3

Cast

They choose a screen or window to share.

WebCast Interface
The WebCast interface for guests.
Note: WebCast must be enabled in EShare settings on the receiving device.

Cloud Broadcast: For Remote Viewers

Need to share the content of a physical meeting with a remote team member?

1

Enable

On the receiver, enable Cloud Broadcast.

2

Share ID

Share the generated secure Broadcast ID with the remote viewer.

3

Watch

The remote viewer visits bc.eshare.app, enters the ID, and can see a live feed of the main screen from anywhere in the world.

Cloud Broadcast Interface
Remote viewers can watch the presentation via Cloud Broadcast.

7. EShare Dongle: Premium Hardware

The EShare Dongle is a premium hardware solution that enhances the EShare ecosystem with true plug-and-play functionality across all platforms.

Plug-and-Play
Instant screen sharing with a one-button connection for quick presentations.
4K & BYOM Support
Up to 4K resolution support, plus seamless integration with your preferred meeting platforms.
Secure Connection
The dongle creates a direct, encrypted connection, bypassing the need for network configuration and ensuring data privacy.

Simply plug the dongle into any laptop's USB-C port and tap the button to mirror your screen instantly.

8. Troubleshooting & FAQ

Problem: I can't connect to the receiver.
First Steps:
  • Confirm both your device and the receiver are on the same Wi-Fi network.
  • Try connecting via IP address to rule out network discovery issues.
  • Restart the EShare app and check if the receiver appears.

Advanced: Your network firewall may be blocking required ports. Please contact your IT administrator for assistance.

Problem: There is no audio during mirroring.
  • Universal: Check that volume is not muted on your source device, the EShare app, or the main display.
  • For Windows: In the EShare app settings, ensure the "EShare Audio" Virtual Audio Card is enabled.
  • For Android 10+: System-wide audio is captured. On older versions, audio will play from your phone.
Problem: Black screen during screen mirroring.

For Windows users, try switching encoding mode in Settings > Encoding Mode, change from "Hardware" to "Software" to resolve compatibility issues with certain devices.

Problem: Miracast (Win+K) is not working.
  • Ensure Miracast is enabled in ESharePro settings.
  • Click the "i" button next to the Miracast option in settings, enable compatibility mode and try again.
  • If still not working, the device hardware may not be compatible. Contact your device manufacturer.

Troubleshooting (Continued)

Problem: Mirroring is laggy or choppy.

A flawless streaming experience depends on a high-quality network connection. Video is particularly sensitive to network performance.

Network Best Practices:
  • Wired Receiver: For maximum stability, connect the EShare Receiver to the network with an Ethernet cable.
  • 5GHz Wi-Fi: Ensure client devices are connected to a stable 5GHz Wi-Fi band, which is less prone to interference than 2.4GHz.
Performance Targets for Demanding Use Cases:
Bandwidth
30 Mbps
Stable bandwidth per video stream.
Latency
< 50ms
Low ping time between devices.
Jitter
Near Zero
Minimal latency fluctuation.

Our Commitment

Our mission is to create technology that feels like magic—intuitive, reliable, and powerful. EShare is built on a foundation of relentless innovation and a deep commitment to the user experience.

We are dedicated to making every one of your collaborative interactions more fluid, productive, and engaging.

Thank you for being part of the EShare journey.

Welcome to seamless sharing.

Dosprn 20 Registration Key Verified -

Disclaimer: This article is for informational and educational purposes regarding software licensing, security risks, and compliance. The distribution or use of cracked software, unverified keys, or keygens is illegal and violates software copyright laws. The author does not provide, host, or promote actual cracks or registry bypasses.


Part 2: Decoding the Search Term – "Registration Key Verified"

What does the user actually want when they add "verified" to their search? The keyword reveals specific psychology.

The 30-Day Ghost

Most cracked keys trigger a "successful registration" message but implant a logic bomb. The software works perfectly for 30 days. Then, on day 31, it begins inserting "DEMO MODE" watermarks over every barcode or cuts off the last 25% of every label. By then, you have integrated the tool into your production line. Now you face emergency downtime while scrambling for a real license.

Option 3: User Manual / FAQ Section

Topic: Troubleshooting Registration Issues

Q: I entered my code and received a "DOSPRN 20 registration key verified" message. What happens next?

A: If you see the message "DOSPRN 20 registration key verified," your software has been successfully activated. This confirmation means:

  1. Removal of Limitations: The "unregistered" watermark or banner will no longer appear on your printed documents. Any page limits or time restrictions present in the trial version have been lifted.
  2. Full Feature Access: You can now utilize the advanced printing features specific to version 2.0, including custom font mapping and support for USB printers.
  3. Support Eligibility: Your registration is now recorded in our database, making you eligible for technical support and potential future updates within the 2.0 version branch.

Note: It is recommended that you save a copy of your registration key in a safe place (such as a password manager) in case you need to reinstall the software on a new computer in the future.

A key benefit of a verified DOSPRN 2.0 registration key is that it provides a permanent license that does not expire. Unlike the trial version, which limits you to 100 documents, a registered copy removes all printing reminders and unlocks the full capabilities of the software. Key Features of a Registered DOSPRN 2.0

Permanent Activation: Once verified, your license is granted "forever" and can be used even if you reinstall your operating system on the same computer.

Print Preview: This version introduced a visual preview option, allowing you to check your DOS reports before they hit the physical paper.

Print to PDF: You can direct your DOS output into a PDF file, making it easy to share or archive documents digitally.

Free Upgrades: Registered users are eligible for free updates to newer versions of the program.

Dedicated Support: Verification grants access to email support to help troubleshoot specific printing or configuration issues. dosprn 20 registration key verified

Language & Graphics Support: Access to full emulation for Epson and HP PCL sequences, international codepages, and the ability to include QR codes or graphics in reports. How Verification Works

The registration process uses a hardware-specific Registration Code generated on your PC. After purchasing, you receive an Unlock Key via the DOSPRN online service that matches your unique code to verify and activate the software. Order DOSPRN 2.1 online. We offer wholesale discounts

Once upon a time, in a dusty office filled with the hum of a legacy accounting system, there was a programmer named

. His company still relied on a specialized DOS-based application that handled their critical records, but there was a catch: the old dot-matrix printers were dying, and the new laser printers couldn't understand the ancient DOS commands. Leo discovered

, a clever utility designed to bridge this gap. He installed the trial version, and suddenly, the reports that used to get stuck in the print queue were flying out of the modern printer with perfect formatting. However, the trial had a limit—it would only allow 100 documents before requiring a permanent license. The Registration Journey

As the document counter ticked down, Leo knew he had to register the software to keep the office running. He followed these steps to verify his key: Generating the Code : Leo opened the DOSPRN properties window

and clicked the "Registration" button. The software generated a unique Registration CODE

based on his computer's specific hardware and software configuration. The Purchase : He went to the official DOSPRN site

and purchased a license. After the transaction, he received his Unlock KEY via email. Activation

: Leo carefully pasted the long string of characters into the registration window. For a moment, he worried he might have a typo, as even an extra space can cause the key to fail. Verification

: He hit "OK," and a "Thank you" message appeared. The "Evaluation" watermark vanished from the reports, and the registration was officially Lessons from the IT Trenches

Leo learned a few vital things about the DOSPRN system during this process: Hardware Bound Part 2: Decoding the Search Term – "Registration

: The registration key is unique to the machine. If Leo had tried to use a code from a different computer, the key wouldn't have worked. OS Reinstalls

: If he ever needed to reinstall Windows, he wouldn't need a new license; he just needed to keep his original order number and previous key to get a new code verified.

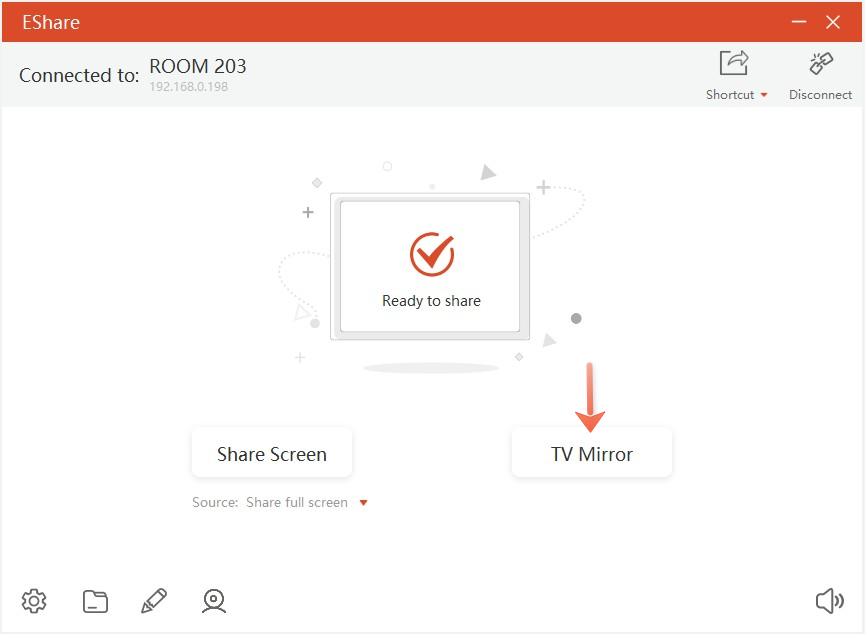
Guide to Verifying Your DOSPRN Registration Key If you are using DOSPRN to print from legacy DOS applications to modern printers, verifying and activating your registration key is essential for removing trial watermarks and limitations. The registration system for DOSPRN uses a two-part process involving a dynamic Registration Code and a permanent Registration Key. 1. Locate Your Unique Registration Code

Before you can apply a key, you must find the code that DOSPRN generates specifically for your computer hardware and software configuration. Open the main DOSPRN window. Click the Registration button.

Look for the Code field. This alphanumeric string is what you need to provide to the Official DOSPRN Service to generate your unique key.

Note: This code may change each time you open the window; this is normal and part of the protection system. 2. Activate Your Registration Key

Once you have purchased a license or retrieved your existing one, follow these steps to verify activation:

Copy and Paste: Copy your unlock KEY exactly as received, including hyphens.

Enter in DOSPRN: Paste it into the corresponding "Key" field in the DOSPRN Registration window.

Verification: Click OK. A "Thank you..." message should appear, indicating the software is now verified and activated. 3. Troubleshooting Common Issues

The "Register" Window Still Appears: If you see a "Thank you" message but the trial window persists, ensure you are running the application with appropriate permissions. You may need to restart the program for changes to take full effect.

Reinstalling OS: Your license is typically "forever." If you reinstall Windows on the same hardware, you can Retrieve Your Key Free-of-Charge using your order number and original email. "verified" usually means:

Hardware Changes: If you upgrade your PC, the generated Code will change. You will need to log in to the DOSPRN User Area to update your key for the new hardware signature. 4. Official Support and Safety

To ensure your key is verified and safe, only use keys provided through the Official DOSPRN Website. Using "cracked" keys or third-party key generators often introduces malware and will not pass the internal verification checks required for stable printing.

DOSPRN 20 – Registration Key Verification


Status: Verified
🔑 Registration Key: [Your‑Key‑Here]
🗓️ Date Verified: [Current Date]


1. The Fake Key Generator (Scamware)

You land on a page that looks like a DOS prompt. It says "Generate Key Below." You click a button, and a string of numbers appears. You copy it into DOSPRN, and it fails. Then a pop-up says: "Your key is blocked. Download the verified crack here." The download is an .exe file that is actually ransomware or a coin miner.

The "Verified" Promise

In crack and warez communities, "verified" usually means:

  1. Malware-tested: The uploader claims the key or keygen has been scanned with antivirus software.
  2. Function-tested: The key actually unlocks the "Registration" dialog box in DOSPRN 20.
  3. Non-blacklisted: The key hasn't been remotely deactivated by the developer (though most legacy software lacks phone-home features).

However, no external crack distributor can offer true verification. You are trusting anonymous forum users on sites with high bounce rates and aggressive pop-up ads.

Part 6: The Ethical & Legal Reality Check

Why do we feel entitled to a "verified key" for DOSPRN 20?

Because the software is old, we assume the developer is either rich or has abandoned the product. This is rarely true. Many DOS utility developers are single programmers or small teams who have maintained their code for 25+ years. They rely on these sales for retirement income.

Furthermore, using a cracked key in a commercial environment is not a "grey area." It is theft of service. The license agreement explicitly forbids redistribution.

Fun Fact: The search volume for "dosprn 20 registration key verified" spikes on weekends (when IT admins work overtime) and declines on paydays. This suggests that people hunt for cracks when their company refuses to reimburse small software purchases.

Guide to Registration and Verification

Scenario C: Legal Liability

The developer of DOSPRN 20 uses software forensics. They detect 10,000 "cracked" installations sending invalid license hashes to their server. They issue a mass DMCA subpoena to ISPs. While they rarely sue individuals, a business using unlicensed software can be fined up to $150,000 per infringement under the Copyright Act. Cost: Bankruptcy.

In every scenario, the free key is astronomically more expensive than the retail license.

Quick Reference Sheet

App-Free Connection

Apple (AirPlay): Open Control Center > Screen Mirroring > Select EShare device.

Windows (Miracast): Press Win + K > Select EShare device.

Chrome (Google Cast): In Chrome, click Cast icon > Select EShare device.

Guest Connection (No Install)

Open browser to casts.app > Enter ID from screen.

Remote Viewing

Open browser to bc.eshare.app > Enter Broadcast ID.

General Troubleshooting

  1. Are both devices on the same Wi-Fi network?
  2. Try connecting via IP Address instead of by name.
  3. Restart the EShare app on your device.

Top 3 Issues & Fixes

No Audio: Check volume on all devices. On Windows, ensure 'EShare Audio' Virtual Audio Card is on in EShare settings.

Laggy/Choppy Video: Connect the Receiver with an Ethernet cable. Connect your device to a 5GHz Wi-Fi network if possible.

Black Screen (Windows): In EShare PC settings, change Encoding Mode from 'Hardware' to 'Software'.

Support

Website: eshare.io

Email: support@eshare.io